Linking two Interaction Custom Tables
An interaction custom table allows you to store 'one-off' data which will be recorded each time a profile interacts with your business. Depending on the context, these interactions can be structured on two levels.
Consider the example of an order made on an e-commerce website. The customer profile may have selected several items in his shopping cart before finalizing his order. The interaction will therefore be broken down into :
-
An order, with the reference, total amount etc. of the purchase
-
Order lines corresponding to each product of the purchase, with the quantity, price etc.
This will also be the structure used to manage abandoned carts with the detail of the articles, receipts with the detail of the different lines of the receipt,...
Representation in Actito
In Actito, this two-levels based structure is translated into two different interaction tables.
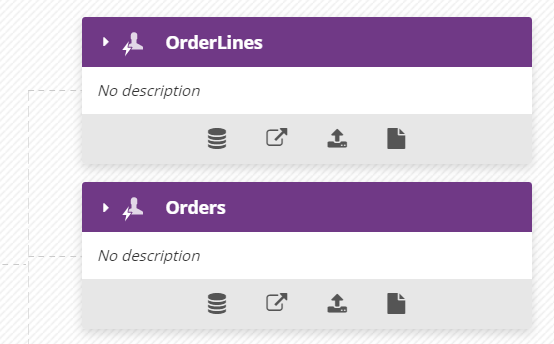
Given that the profile table is at the center of Actito's data model, each one of these tables should always be linked to the profile table. This is the main link. Each entry of these two tables will always be linked to one profile.
However, it is possible to set up an additional link between these two tables, in a similar way to the link that can exist between a Repository Custom Table and an Interaction Custom Table (see chapter on "Understanding Tables Capabilities"). Thus, each entry of the table "OrderLines" will always be linked to one particular "Order". This allows a logical and coherent organisation between the two levels.
Setting up the technical link
The link between both tables should be set up in the structure of the table, via its JSON definition file.
The link should be set up in the second level table (e.g. "OrderLines"). Indeed, the constraint goes this way: to exist, each "Order Line" will have to refer to an "Order".
At set-up stage
From a practical point of view, the link should be specified in the "links" parameter of the JSON table creation file, via a link of type "DATA_SOURCE_LINK" (the same way a link with a Repository table is set up). For more information on the components of this parameter, please refer to the "links" section of the page "Structure a JSON definition file".
In this case, the "source" refers to the second level table (e.g. "OrderLines") and the "target" refers to the first level table (e.g.: "Order").
A common entry field should be used as a key between both tables, e.g. the reference of the order. This field should be unique in the "Order" table, but not in the "OrderLines" table.
"links": [
{"objectType": "DATA_SOURCE_LINK",
"linkName": "datasource2",
"sourceFieldName": "orderId",
"targetFieldName": "orderId",
"constraintType": "none",
"targetedEntityName": "actito",
"skipIntegrityCheck": null,
"targetedDataSourceName": "orders"
}Tip
When setting up a link between a Repository table and an Interaction table, the linking field must have the property "extended" (see "Structuring your JSON definition file").
This is not the case when the link is made between two Interaction tables.
Afterwards
It is possible to add a link between two existing interactions tables. Be careful to properly analyse the integrity constraints before executing such an operation (see below).
To do so, you need to use a JSON update file. Go to "Manage table structures" (Catalog > Data model > Manage table structures) .
Select the second level table (e.g.: "OrderLines"), and click on "More", followed by "Update".

You then need to upload an "addRelation" type of JSON, which defines the following elements:
-
"relationName": reference of the link (no impact)
-
"property": the name of the linking attribute in the second level table.
-
"targetDataSourceId": the ID of the first level table (the name is not valid)
-
"targetProperty": the name of the linking attribute in the first level table (usually, the identification number of the order)
Example of JSON addRelation{"type":"addRelation","relationName":"orderDetails","property":"orderId","targetDataSourceId":"2634dc86-3cd3-47db-9f2c-5dd5e8c31b43","targetProperty":"orderId"}
Impact of the link in Actito
Setting up a link between two interaction tables ensures consistency between these two data levels.
This also implies that these two tables will be linked to each other by an integrity constraint: an "Order Line" can only exist if the corresponding "Order" does too.
Tip
It is important to take this integrity constraint into account when setting up your data synchronization, whether they take place through file exchange or by single API calls.
Any entry in the first level table (e.g.: "Order") should always be created before the related entries in the second level table (e.g.: "OrderLines")
As long as this integrity constraint is taken into account for your synchronizations, setting up a link between two interaction tables will have two main benefits in Actito:
For e-mails customization
For targetings
This link between the two tables ensures data consistency at both levels, with a degree of reliability that is not possible without this integrity constraint.
E-mail customization
Following the previous example of "Orders" and "Order Lines", consistency is particularly useful when setting up a transactional e-mail and an order confirmation scenario.
Such a scenario is usually triggered by an interaction in the "Order" table: indeed, it wouldn't be relevant to trigger a scenario for each "Order Line". However, a confirmation e-mail will have as a purpose to sum up the order, which implies using the information contained in the "Order Lines" to customize the e-mail.
Actito gives you the necessary tools to ensure consistency between the first level table, which triggers the scenario, and the second level table, which is used to customize the e-mail. The same logic will be applied for abandoned carts, ticketing systems by e-mails, ...
Triggering a scenario
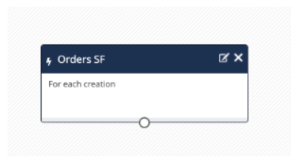
The scenario will be triggered by a block of type "Other Interaction" corresponding to the first level table (e.g.: "Orders").
For more details on this block, refer to the page "Understanding the Blocks of a Scenario".
Setting up the customization
In order for an e-mail to be used in a scenario, it should be either scenarized or transactional.
It will be necessary to set up the two interaction tables in the data sources of the e-mail. For more information about data sources, please refer to the page "Customizing an E-mail".

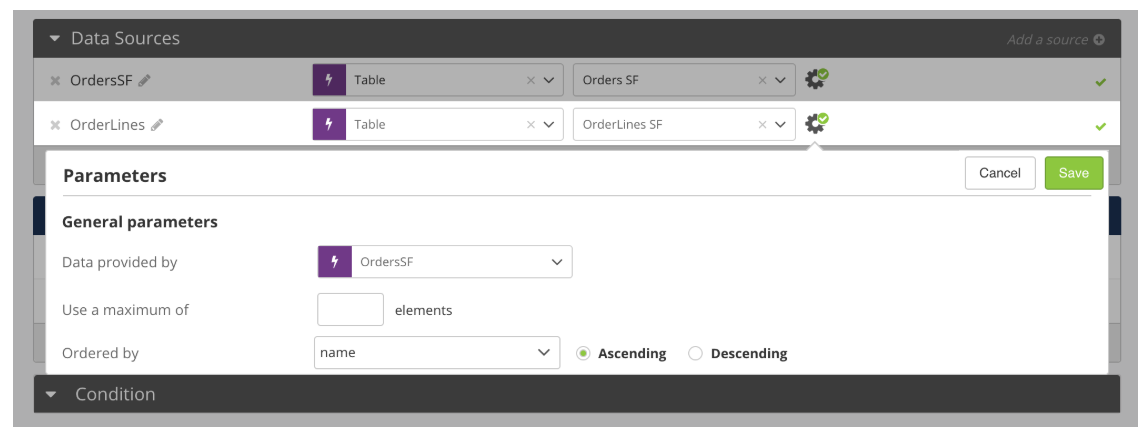
You will then need to configure the link between these two data sources by choosing the selection criteria of the data by clicking on t he settings icon.
The first level table ("Orders") is directly linked to the scenario, because the trigger event is a new entry in the table.
Therefore, the data needs to be "provided by the scenario". This ensures that the interaction that triggered the communication is the one that is used in the message, even if several orders are made on the same day.

However, the communication will also be customized based on the details of the interaction, i.e. the second level table ("Order Lines"). Thus, those lines need to be consistent with the order that triggered the communication.
The data from the "Order Lines" will therefore be provided by the corresponding "Order". This ensures that the information used to customize is consistent with the interaction that triggered the communication, even if the detail is stored in a different table.
Information
The data from the second level table ("Order Lines") can only be provided by the first level table ("Order") if a link between both was established in their structures.
Otherwise, only the basic options "by default" and "provided by the scenario" will be available.
You can then configure the values of your personalizations based on the second level table ("Order Lines"), knowing for sure that the displayed information is referring to a single interaction; the one that triggered the communication.

Tip
By definition, a confirmation e-mail or an abandoned cart reminder will involve several order lines. To display these different lines, you can set up a loop personalization. For more information on this subject, please refer to the page "Creating a Transactional E-mail".
How to use in targetings
The link between an "Order" table and an "Order Lines" table can also be used to ensure consistency in targeting criteria based on a first level table and a second level table.
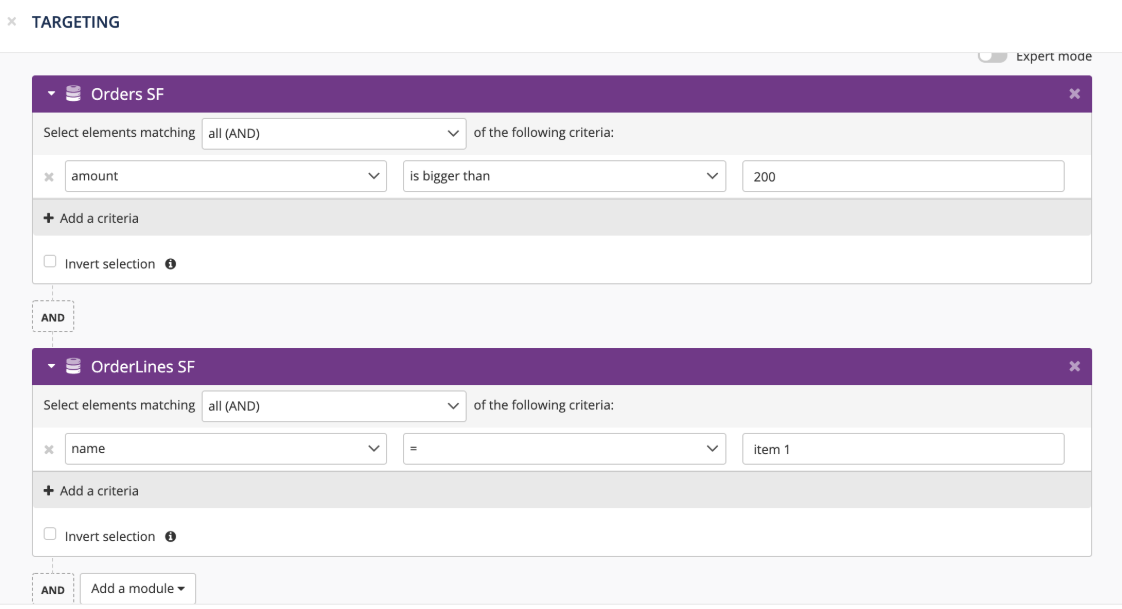
Indeed, without this link, you can create the following targeting, but nothing ensures that the lines containing item 1 or 2 are related to an order of more than 200€.
WRONG !
Explanation of the targeting
In this targeting, Actito will first check if the profiles have at least one order (any order) whose amount is above 200€.
Then, Actito will check if the profiles have at least one order line (any order line) containing item 1.
The targeting will only select the profiles that comply with those two criteria, but with no direct link between both. This means that this targeting does not equals selecting the profiles that have made an order containing item 1 and whose total amount is above 200€.
On the contrary, a profile that has made an order of 300€ including item 3 and 4, and another order of 100€ including item 1, will be selected by this targeting.
By linking these two tables, Actito gives you the possibility of using this link in your targeting.
Setting up a two-level targeting
To link both tables in your targeting, you need to enable the "Expert mode".
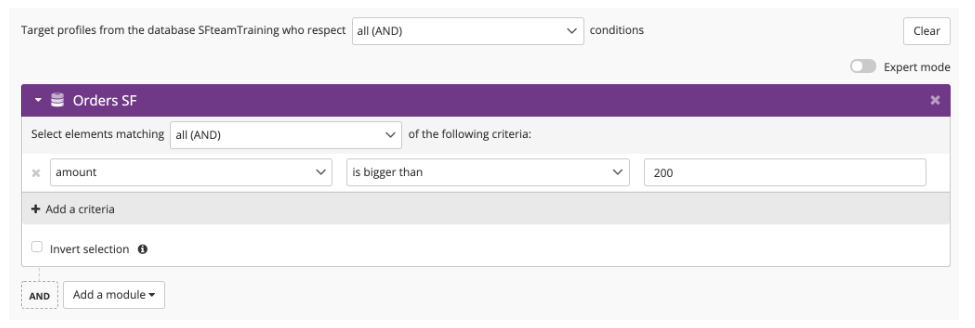
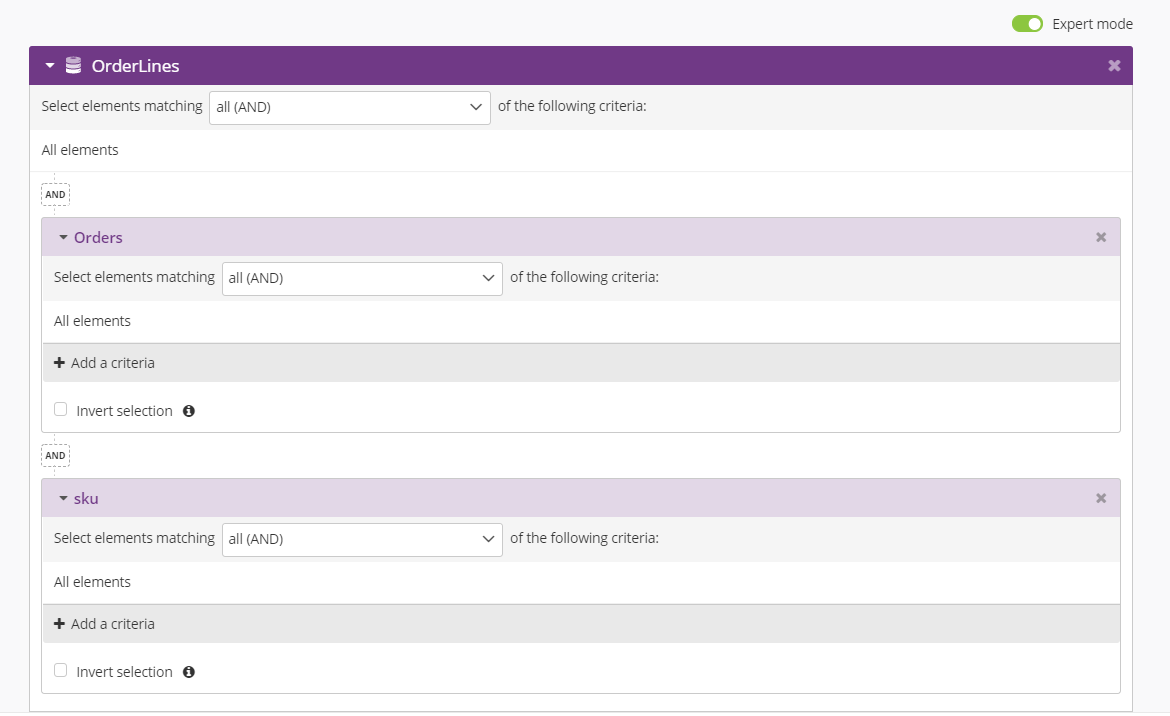
The expert mode will display a button that allows you to add a targeting subset on a table linked to your first table.

This allows you to combine your two criteria, making sure they are linked.
This subset will result in adding an implicit criteria to only take into account the order lines that correspond to an order that meets the first criteria.
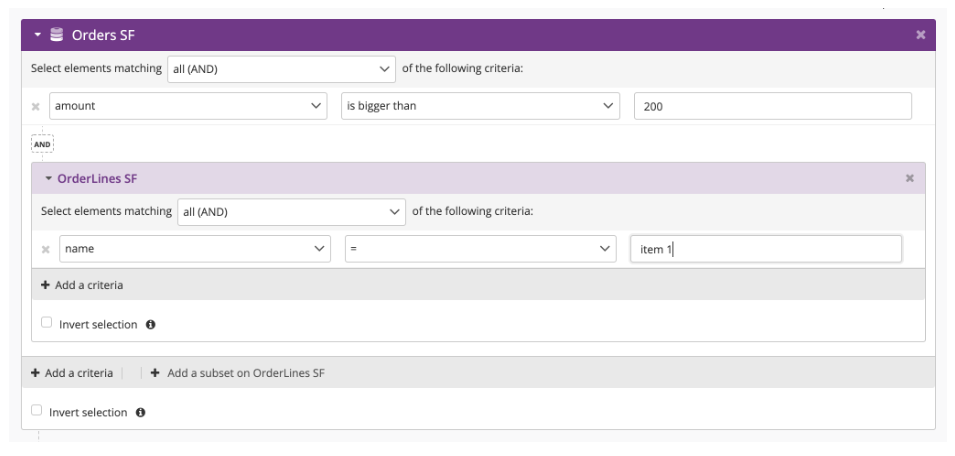
This way, this targeting will select profiles that have an order above 200€ and whose detail of this particular order contains item 1.
Understanding the process behind the selection
It is important to understand that, in a targeting, criteria are analyzed set by set.
Using aggregate operators
This means that, when using a subset, the criteria on this subset will be evaluated order by order.
The use of aggregate operators (number of, min., max. and average) will therefore be applied on the detail within a single order, and not on all the order lines.
So, the following targeting will check if the total of all lines corresponding to a single order corresponding to the level 1 criteria is higher than 500€. It won't result in checking the total of all order lines associated with an order dated in 2019.
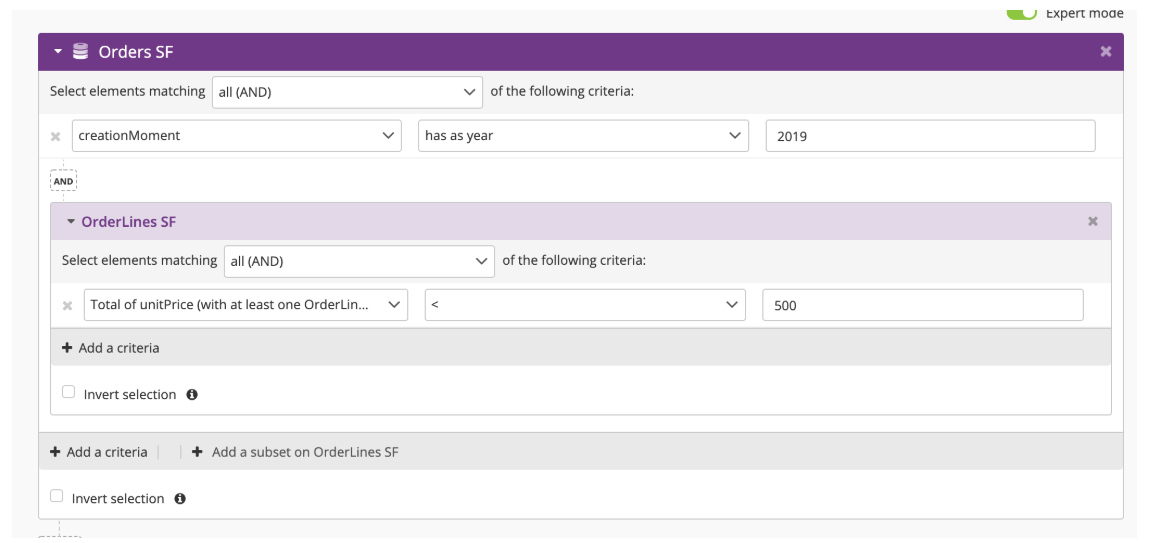
To be selected by this targeting, a profile should have done (at least) an order in 2019 for which the total of lines (of this particular order) is above 500€.
Adding criteria on several second-level lines
Even after adding a subset on a second-level table ("Order Lines"), you still have the possibility to add another subset on that same table.
This is useful if you want to add criteria on several second-level table lines. Indeed, the criteria placed in a single block will be analyzed line by line.
This means that, to allow the selection of profiles that made an order above 200€ including both item 1 and 2, this targeting won't give any results. Indeed, the same order line can't contain both item 1 and 2.
WRONG !
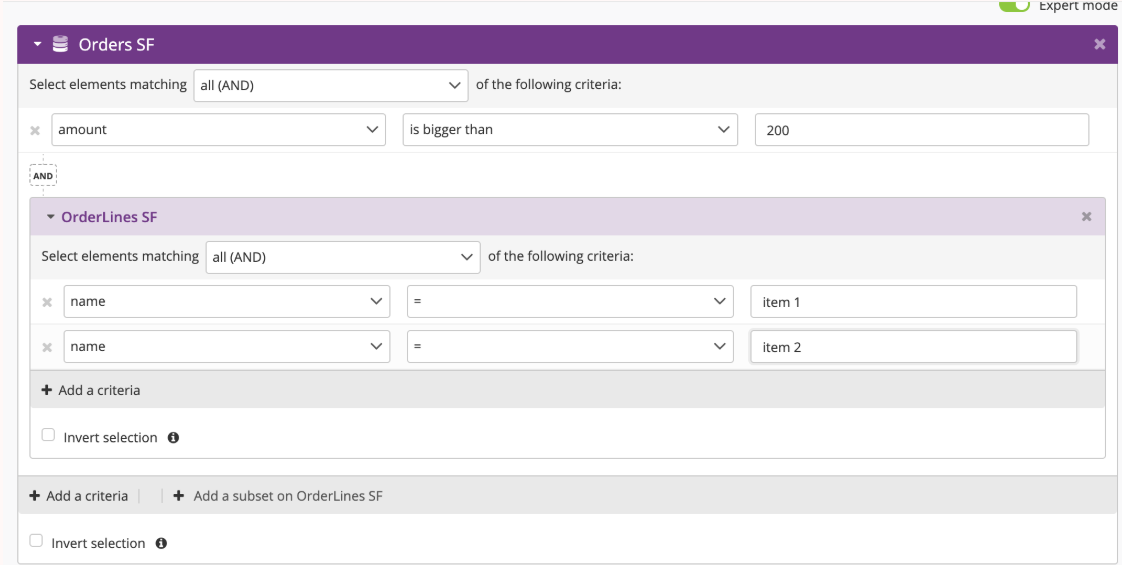
To do a correct targeting, you should break it down into two blocks of "OrderLines":
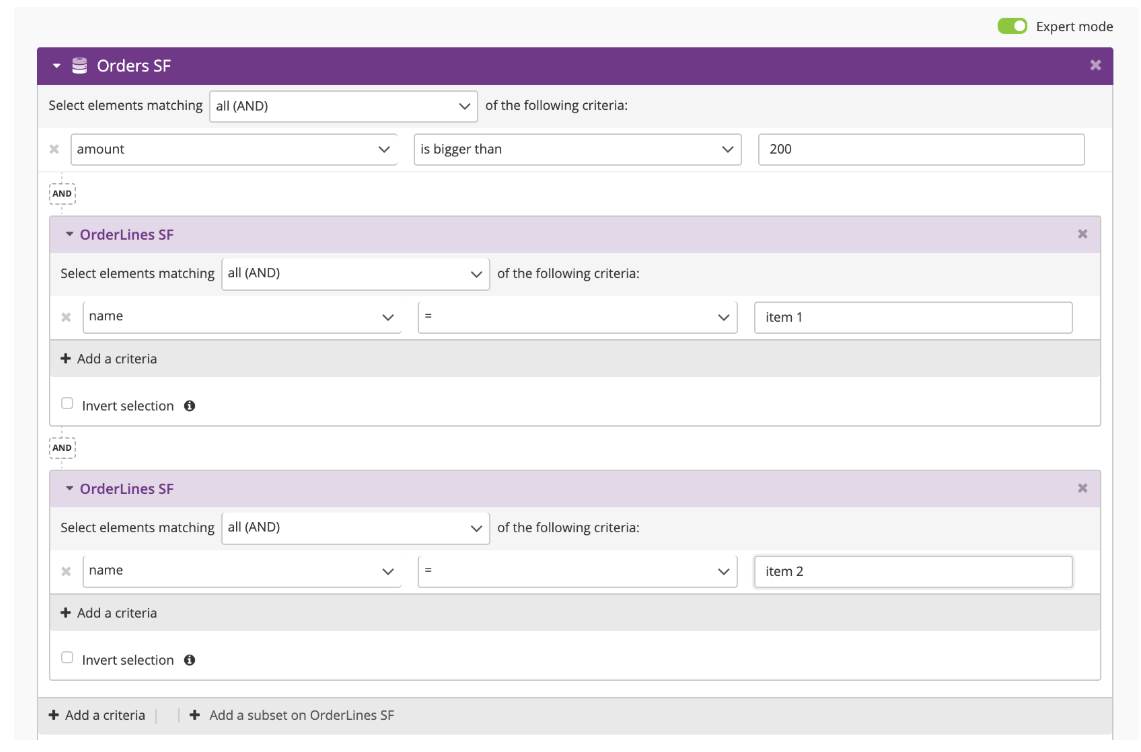
Setting up a three-level targeting
It is possible to add a subset to a subset to create a three-level targeting. This is the case if three interaction tables are linked together, for instance, an "Orders" table, an "Order Lines" table and a "Products" table.
The "Products" table can either be an interaction table or a repository table, depending on whether or not it falls within the 10 000 lines limit of a Repository table.
