Managing API users
One of the main aims of Actito is to offer you a great level of connectivity in your marketing approach. That is the reason why we invest our efforts in making possible the exchange of data between Actito and other systems specific to your activities.
The available public APIs allow you to interact with Actito without having to do it through the Actito interface.
Using an API requires a specific user account, different from the access account for the interface.
The 'Admin' users of a licence can create this type of account directly from the "API users" app in the License configuration platform.
Creating an API user
On the app's start screen, you will see all the existing API users.
To create a new one, click on "+ Create an API user".

Next, fill in the information for the new API user:
First name and last name
E-mail address
Cellphone number
Language and Sex
Custom Access Rights
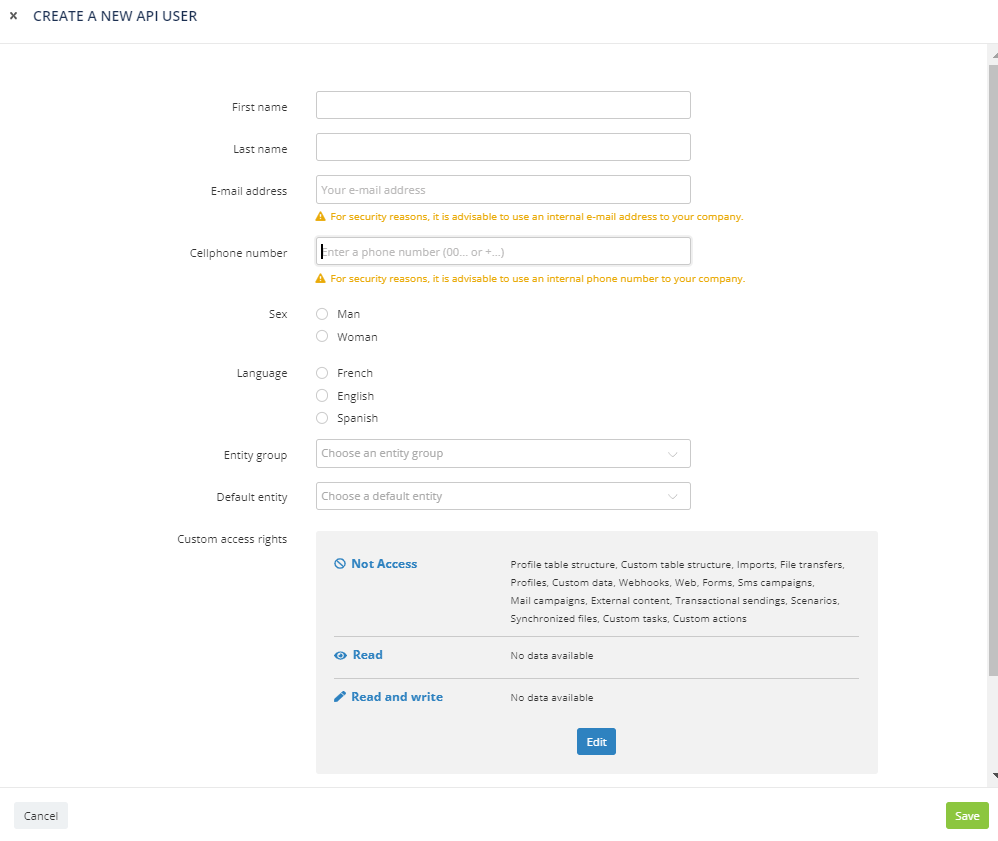
Manage custom access rights
Just as the access rights to the platform are defined by the user configurations, it is possible to restrict the calls that can be made by an API user.
The administrator of the API users of a license can define the rights for each user (No access/Read/Read and write) for different operations grouped under 4 categories.
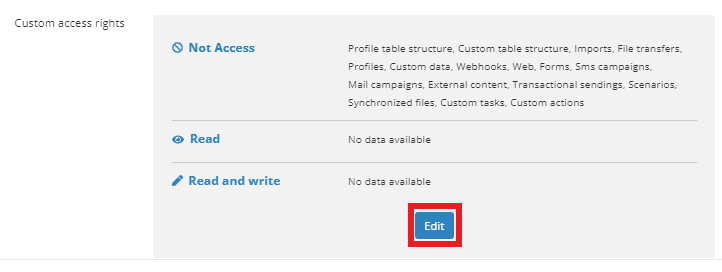
The rights can be edited by clicking on the 'Edit' button.
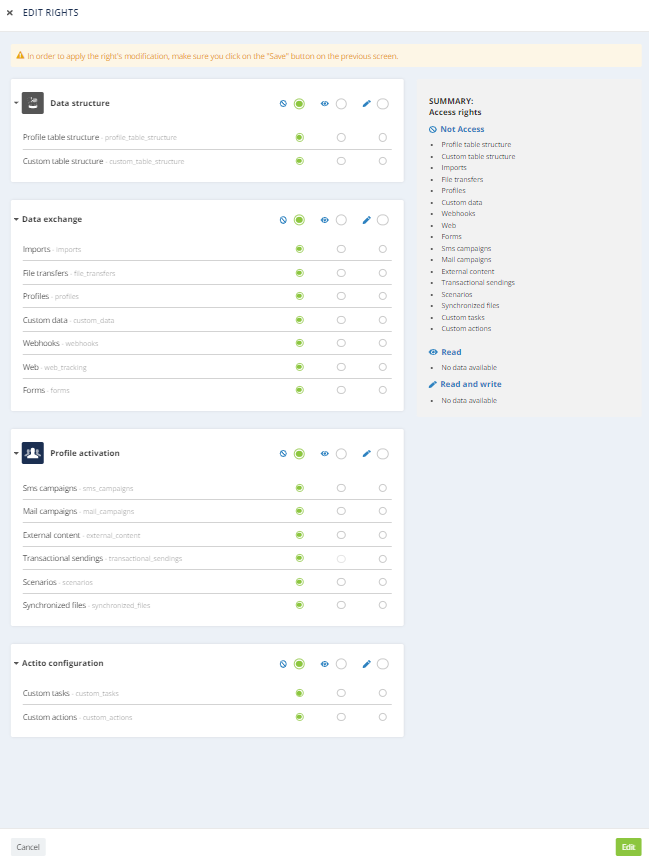
In the interface, the administrator can define access by module and by level. To do so, he must select the level of access he wants to give to the user to different modules that belong to different groups (detailed below). Once the accesses have been selected, you must click on "Save" so that the selection is saved.
There are 3 different levels of access:
-
No access: the user will not be able to make any calls on this module
-
Read: from a technical point of view, the user will only be able to make calls with the GET method on this module
-
Read and write: from a technical point of view, the user will be able to make calls with all the methods implemented on this module (GET, POST, PUT, PATCH, DELETE,...)
Then, there are 4 different groups structured in modules:
Data structure
This group allows you to manage the structure of profile tables and custom tables.
Data exchange
This group includes data exchanges such as data imports, file transfers and ETL synchronizations, profile and custom data management, webhooks, goals and forms.
Profile activation
This group includes actions that enable profiles to be activated through communication channels such as sms campaigns, e-mail, external HTML content libraries, transactional mailings, scenarios, and synchronized targeting files.
Actito configuration
This group contains the tasks and custom actions to integrate Actito with external systems.
To get the category details of each existing API call, download the following file: taxonomy-api-rights-en.xlsx. It contains the taxonomy of these different categories with the associated modules, the possibility or not to define an access right, the groupings of operations according to the structure of the documentation for developers, the URL of the documentation related to each call and the scope (Read/Write):
In the developer portal, the necessary rights are also specified under each call.

tip
When we talk about "write" access in Actito API rights, it systematically implies the highest module, which gives access to both read and write information. There is no access level that allows only writing, without reading.
Manage existing users
Once the user has been created, you can always access the user contact data by clicking on "View". You can also modify the contact data by clicking on "Edit".

View the API key
The authentication generated by the "Manage API users" app is done through an API key-based system. This system offers a greater level of security and autonomy than the access with basic authentication that the Actito support team used to create before.
Authentication through an API key gives you direct control over the API management, which will not depend on a password that, if reset, could have an impact on your integrations.
Note
All API users with basic authentication will keep on working. However, every new API user must be created with API key-based authentication.
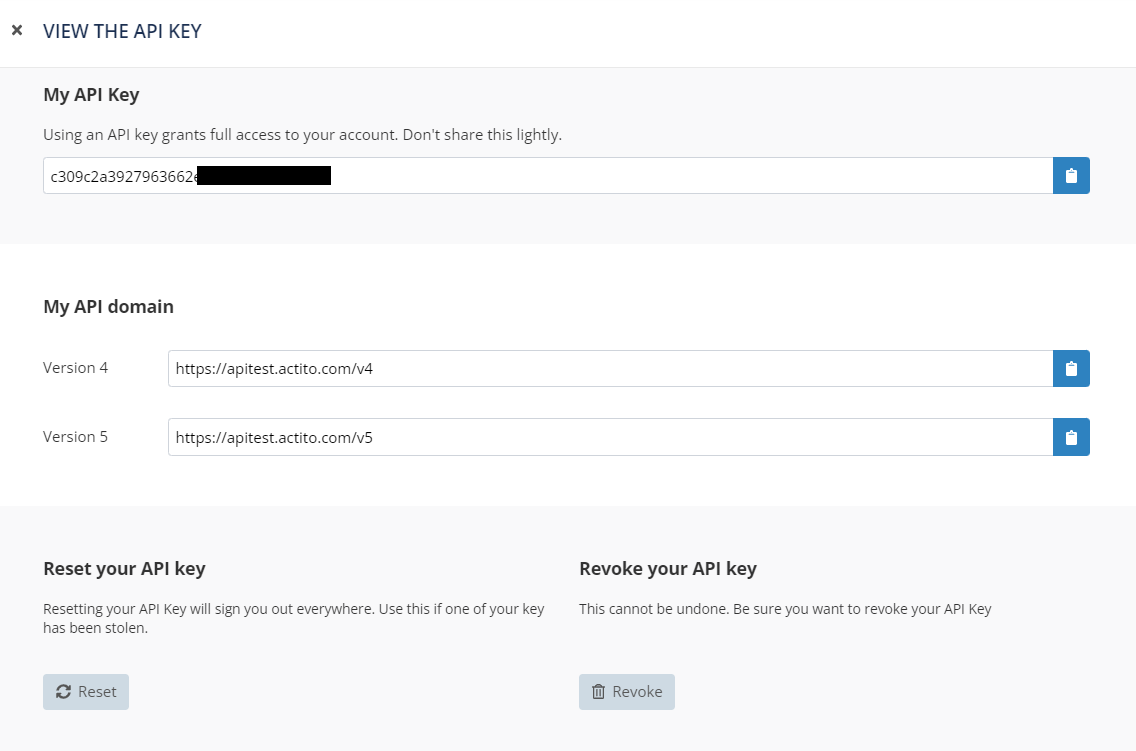
To see an account ID, click on "View API key".

The API key is a character string that your IT team can use to connect to the API. With the button at the right, you can directly copy the key to share it with the relevant people.
Securing the key
Your license API keys will only be available from the "Manage API users" app. This app is only accessible for users with the "AdminUser" rights configuration.
This means that only the license administrator will have control over the API users, who are usually members of the internal IT team or external providers. The information required to create an API account includes the user's e-mail address and the phone number so that the license administrator can communicate the key through a secured channel.
An API key is enough to connect and it is not linked to a password. In this way, there is no risk that the credentials will be lost or forgotten, as they will be always stored on the "Manage API users" app.
However, there are different ways to block the access of an API key.
Resetting the key
Resetting the key allows you to cut off its access if it has been compromised. This action will interrupt all the existing API calls. A new secure key will be generated right away so that you can set up again the legitimate calls.
Revoking the key
Revoking a key means deleting it. It will not be valid anymore, including the existing calls.
A revoked key cannot be recovered.
Deactivating a user from the app's main menu will have the same effect. The user will then appear in the deactivated users' tab. In the event of reactivating a deactivated account, it will be necessary to reset the user key.

Deleting a user
It is also possible to completely delete a user through the buttons "More" and "Delete".

Attention
Resetting, revoking, and deleting a key will disconnect all the API calls set up with that key.
Using the API key
When setting up an API, the key is not used directly as an identifier.
The key is used to generate an access token that will be valid for a limited time (15 minutes) and that you must include in all your calls.
For example, to generate a token in the TEST environment, the call will be
GET https://apitest.actito.com/auth/token
with the API key in the "Authentication" header.
curl -X GET 'https://apitest.actito.com/auth/token' \
-H 'Authorization: qhdfbvdh747R49FRHrthqhdfbvdh74' \
-H 'Accept: application/json'
The token generated can be used for the authentication of calls during the following 15 minutes. It must be passed as a 'Bearer' Authorization in every call.
curl -X GET 'https://apitest.actito.com/v5/entities/MyEntity/etls' \
-H "Authorization: Bearer
eyJhbGciOiJSUzI1NiJ9.eyJqdGkiOiI0IiwiaWF0IjoxNTg2ODY1MjE1LCJpc3MiOiJhY3RpdG8iLCJleHAiOjE1ODY4NjYxMTUsImxpY2VuY2VJZCI6MTI3NDAsImFjY291bnRJZCI6MTIsInBvbCI6Im1haW5Qb2xpY3lBcGkiLCJzdWIiOiI2ZWY3YjZmYS0wYTc1LTQ1YTYtYmE5My1iZGY5MmUyZjg3NDAifQ.umizXm0TueN6jRkMCaz9AnQP30qNxud5XIxnZiPzz24L8Aon7WKeJ8_49xcjsTe_v13nv4AI9991Mw_k9bvQffT__eikkv9UMmZ22wvQr5UxCH5Y-NkxFRctEGLjmkEdFFe2EuOkF1GjsIetPrJgY-_L6bpoa3G0o69IWavBIFowQtw_q0FOPaZ_JtBLiDiFH59IM5s4-8S-QAhGkGgjOhTzqBTyDBGj8cqnhvr9eFwgoxGSAZ1QLGU5yTRyIJm8Uaq97M5UhKn98ixK4oQhQvVKwW9MDgGyf0jLFLEFO7l9kyFON34OsxiTyK58U_OFJzehgxqRokBE3wXWo9rKEA" \
-H 'Accept: application/json'
Tip
For more information about the URL used to generate the token in the different environments, or about authentication in a broader sense, there is an article about it in our technical documentation that your IT team might find helpful.
API key-based authentication is compatible with versions 4 and 5 of our public API.
Restricting the IP address
For additional security, you can associate the API key to a specific IP address (or a range of IPs).
Activate the "Advanced parameters" when you create a new API user or edit an existing one to restrict the use of the key to a specific IP.

If an API request is intercepted from an unauthorized IP, it will be rejected and a warning will be sent to the e-mail address associated with the key.
The restriction can either be defined as a simple IP address or as a CIDR address (subnet).
In the latter case, the range must be provided with the format IP + CIDR.
For example, to put a restriction on IP 192.168.1.1 with a subnet mask of 255.255.255.248, the value that should be provided in the restriction would be 192.168.1.1/29
|
CIDR |
Available bits |
Subnet mask |
Number of hosts per subnet |
|
/1 |
31 |
128.0.0.0 |
2^31^-2 = 2 147 483 646 |
|
/2 |
30 |
192.0.0.0 |
2^30^-2 = 1 073 741 822 |
|
/3 |
29 |
224.0.0.0 |
2^29^-2 = 536 870 910 |
|
/4 |
28 |
240.0.0.0 |
2^28^-2 = 268 435 454 |
|
/5 |
27 |
248.0.0.0 |
2^27^-2 = 134 217 726 |
|
/6 |
26 |
252.0.0.0 |
2^26^-2 = 67 108 862 |
|
/7 |
25 |
254.0.0.0 |
2^25^-2 = 33 554 430 |
|
/8 |
24 |
255.0.0.0 |
2^24^-2 = 16 777 214 |
|
/9 |
23 |
255.128.0.0 |
2^23^-2 = 8 388 606 |
|
/10 |
22 |
255.192.0.0 |
2^22^-2 = 4 194 302 |
|
/11 |
21 |
255.224.0.0 |
2^21^-2 = 2 097 150 |
|
/12 |
20 |
255.240.0.0 |
2^20^-2 = 1 048 574 |
|
/13 |
19 |
255.248.0.0 |
2^19^-2 = 524 286 |
|
/14 |
18 |
255.252.0.0 |
2^18^-2 = 262 142 |
|
/15 |
17 |
255.254.0.0 |
2^17^-2 = 131 070 |
|
/16 |
16 |
255.255.0.0 |
2^16^-2 = 65 534 |
|
/17 |
15 |
255.255.128.0 |
2^15^-2 = 32 766 |
|
/18 |
14 |
255.255.192.0 |
2^14^-2 = 16 382 |
|
/19 |
13 |
255.255.224.0 |
2^13^-2 = 8 190 |
|
/20 |
12 |
255.255.240.0 |
2^12^-2 = 4 094 |
|
/21 |
11 |
255.255.248.0 |
2^11^-2 = 2 046 |
|
/22 |
10 |
255.255.252.0 |
2^10^-2 = 1 022 |
|
/23 |
9 |
255.255.254.0 |
2^9^-2 = 510 |
|
/24 |
8 |
255.255.255.0 |
2^8^-2 = 254 |
|
/25 |
7 |
255.255.255.128 |
2^7^-2 = 126 |
|
/26 |
6 |
255.255.255.192 |
2^6^-2 = 62 |
|
/27 |
5 |
255.255.255.224 |
2^5^-2 = 30 |
|
/28 |
4 |
255.255.255.240 |
2^4^-2 = 14 |
|
/29 |
3 |
255.255.255.248 |
2^3^-2 = 6 |
|
/30 |
2 |
255.255.255.252 |
2^2^-2 = 2 |
|
/31 |
1 |
255.255.255.254 |
2^1^-0 =2 |
|
/32 |
0 |
255.255.255.255 |
2^0^-0 =1 |
Tip
Keep in mind that an IP restriction is ideal to restrict the access only from your machines with a fixed IP, but less so if the key will be used for manual testing/implementation by human users with dynamic IPs.
